Showing posts with label Katee. Show all posts

Monday, July 23, 2012

Sewing with Kids ... er Tweens!


Katee is officially a tween (how is it that that word is acceptable?!). My niece Katee was in town for the past week, and while it was hot and a bit rainy outside, we had a lot of fun sewing!


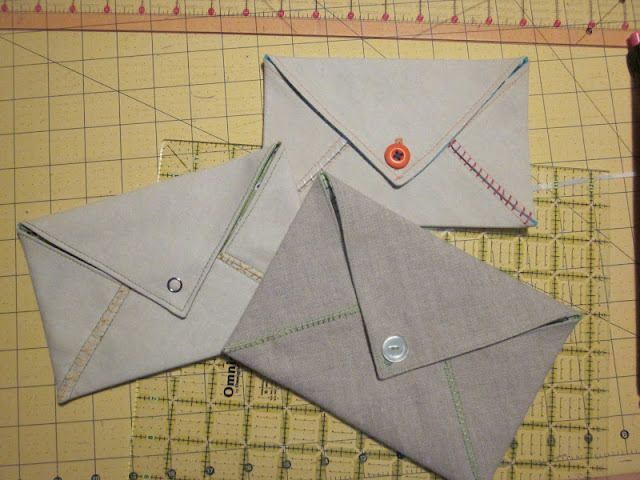
My friend Emily came over one evening and we'd decided on making these fabric envelopes together. We each got working and it was a lot of fun!


I made a mini design wall for Allie, and cut her some 2.5" squares for her to play with while we sewed. It didn't work completely, but it wasn't a dud either. She played nicely for a while. The most hilarious thing? Allie kept calling Emily, "friend Emily" it was really funny!


Katee and I sewed in the evenings after Allie went to bed most nights this week. She finished a pillowcase, a large boxed pouch, a mini zip pouch, and the fabric envelope! She was free-piecing all on her own after just a little bit of instruction! I'm loving the zebra pillowcase!

It was a really great week, and it's been a lot of fun seeing her grow as a sewer throughout the years. She's been sewing with me since she was seven - here we are five years later and she's growing and learning! I'm so proud of her!!

Monday, February 20, 2012

Quilts in the Smokies.

You may have noticed that I haven't been here all week. Yep, we went on a big grand family vacation. 14 of us (including four children) in one big cabin near Gatlinburg Tennessee. It was really a great time! 

The picture above shows the deck of our cabin (yes there was a hot tub out there!) ... with a nice view of three of the four made-by-me quilts that were brought on vacation by family members! Rosemarie's quilt was being used for a movie-time cuddle so it's not pictured. :) Such an awesome feeling to know that everyone loves their quilts so much. 


Here are some highlights of the trip in photo display... Cute cousins sharing a menu.


Crazy tons of family squishing together for a photo.


Girls sharing the experience of a visit to the aquarium.


The little ones helping Mimi (grandma) with breakfast.


And posing for a picture near a pretty stream. 

It's been a relaxing week -- but I can't lie... I'm pretty happy to have Internet again! :) Not that it wasn't fun trying to steal wi-fi from our neighbors in the rain, in my sister's car, at midnight.... lol. 

More cool things to follow!

Monday, September 19, 2011

A Quilter's Dream!

 Two things happened this weekend that would certainly fall under this title. 

First this happened: 

Three quilts in a row. Wally's quilt, my quilt, and Rosemarie's quilt
(Which she brought with her!)

My family was in town this weekend and There were air mattresses all around. On top of each one? A quilt!! All but one of them was made by me, and one of them was made by my Aunt Kathy (given to me when I was about 10). 
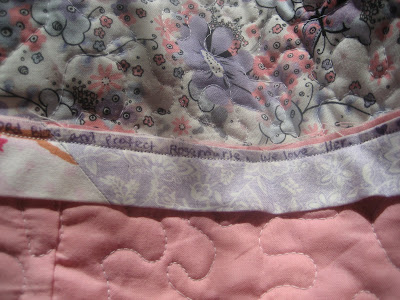
In the other room two more! My first ever quilt (t-shirt quilt), and one made by Aunt Kathy.
(Crumpled on the unmade bed? Allie's quilt)

Pretty amazing right? I love the thought that my quilts kept them warm all weekend! :) 

Second: 

This evening before dinner, Wally called me in to the kitchen to see what Allie was playing. To our surprise she was playing "fabric store" with the paper towels (strange enough to have them in the house!). She rolled out a few lengths of towel, then used her two fingers in s scissor motion to "cut" (rip) them apart. Too cute! She kept talking about cutting fabric.... adorable! 


Wednesday, August 24, 2011

I've been away...

No excuses here. I spent the week with my neice Katee - who stays with us for a week every summer. She went home today so now I have time to catch you guys up on the fun happenings around here while she was here!

First of all Katee is awesome! She just turned 11 and has been sewing with me for... four years? (has it really been that long!!??) I set out with the idea that we might make these purses that Kat made recently. I'd pinned the tutorial and it all seemed pretty simple although challenging enough for Katee. We've mostly made small flat items while sewing. This one required three pannels of patchwork that was sewn "quilt as you go." 

She rocked! No I didn't happen to snap any pictures of her in process (this mostly happened after 9:00 pm while my kid was sleeping). I do have to tell you about the back of her pouch. We'd already done the first two pannels doing typical paralell stitches in the quilt as you go pieces. I left the room to start fixing dinner and came back to see her with an almost completed panel featuring concentric rectangle quilting!! I'd not shown her how to do that or even that she could do that! I don't know that she'd even seen that done on any projects before! Katee rocks! Her color choice for the back was pretty awesome too!

She ended up quilting her initial and last name on the back as well. Pretty clever that one! :) I'm really impressed!

That project took us through most of the week - since we didn't have too much free (toddler free) sewing time to work. She did all of it but the free motion quilting on the top flap. - all the construction and everything! 

Among the other activities that the week included, we made a fort using her fort kit that I made her and her sister for their birthdays (link to tutorial here).

We also had ourselves a little tea party. It wasn't as frilly or pretty as I'd have liked... but it was pretty cool! We had finger sandwiches and tea and fruit. It was a yummy little party. I broke out my tiny espresso glasses for the occasion. :)

Hope you had a great week as well!!
Travel Handmade with The Sewing Summit
linked up for Travel Handmade!

Wednesday, July 20, 2011

CMQG meeting, etc...

Sunday was a busy sewing day! We had our July meeting of the Chicago Modern Quilt Guild. It was a sew-in which was pretty nice since most of us had hand work with us to do - it ended up being almost all of us around one table chatting and sewing. Sweet!

At the meeting we got to see everyone's mug rugs from the swap - it was pretty impressive! It was nice to get feedback about mine too. I'm always amazed when these ladies like my stuff... my style is much different than some of theirs and they've been at it for much longer than I. Such a great group! 

I decided to give away my "fish baby" quilt. My friend Alexandra is pregnant and due in a couple months... they're having a boy and that quilt is so cool and really boy-ish (as boy-ish as my quilts get). I did some bits of embroidery on it to make it a little bit more special for them.

At the meeting I had help from the other Emily - in choosing a binding fabric for my DQS11 quilt. Yes, I'm ready to bind it already! After the meeting I added a couple little borders of hand stitching too. I love it! :)

On a whim this evening (about...11:00pm?) my husband informed me that he accidentally told a friend that I was making their baby a quilt (I had made a little tag blanket and toy... but not a quilt...yet). So I decided to see what I could come up with on short notice (I don't really have a fabric stash... meaning I don't have many fabrics that I have even a full half yard of... let alone boy fabrics!). So I went with it. Thanks to my pinterest board for baby quilts I didn't have to think much before deciding on one to make. I finished the quilt top a bit ago... (took maybe an hour or so?).

One more point of business. I purchased some fabrics from our sale table at the guild meeting (everyone brings their cast offs and then we purchase fabrics that others didn't want - the proceeds go to the guild fund).. The fabrics were maybe considered "scraps" but I saw a use for them... I've bundled up part of them to be a little fat eighths bundle for you (a giveaway) and the rest are bundled for my niece for her birthday! More on that later - stay tuned!

Wednesday, June 22, 2011

Why Haven't I Posted This Yet?

Haha. I just wrote half a post about a quilt that I'd already shared but thought I hadn't. Funny how that happens sometimes!

Instead here are some pretty pictures that are lurking on my computer but don't qualify for their own blog posts. 

(Above) Curtains from my old sewing room are now in Allie's bedroom. They look cuter than ever with little yellow fabric scrap ties. I love them. (Ikea rocks). PS When hanging the curtain rods I used a drill for the first time in forever (my BIL's) and I must say I like the power. 

I love this picture. The look on Roseann's face is sweet. The girls looks so happy and chilled out. 


Strawberry Buttercream. Need I say more? YUM!

Haha. Funnest thing ever? Colored frostings in squirt bottles for decorating during a party!

Awesomest kindergartner (holy wow is she getting old!) party game? Relay races with floaties on. No real reason for it. No prize for the winning team. No worries about who "won" (the girls actually tended to wait for the slower runner at the end before turning back to run to the finish line!). Fun. 

Happy birthday sweet Rosemarie!! :)

Friday, February 18, 2011

{Easy} Glasses Case Tutorial

This weekend my neice Katee is in town with us and she asked to sew. Of course we came up with an awesome little project (and we took pictures along the way to share). 

To make an awesome padded glasses case you'll need just some scraps of pretty fabric and batting.

***To be sure that your glasses will fit please first measure your glasses, folded up, from top of frame to bottom of ear piece. Ours folded up pretty narrow. If you need (or just to be on the safe side) you can add an extra inch or more to all those 5.5" measurements to allow extra room for larger glasses.***

Cut:
Cuff Fabric (pictured in purple): 2" x 5.5" 
Contrast fabric (grey): 1" x 5.5"
Main fabric (teal): 5.75" x 5.5
Lining fabric: 5.5" x 7.5"

1) Sew cuff, contrast, and main fabrics together as desired.
2) Stack fabrics in this order: on top - lining fabric, right side down
                                               middle - outside/patchwork, right side up.
                                               bottom - batting
3) Sew short side together.
4) Open up fabrics and iron seam allowances and batting toward the outside fabric.
5) Fold entire piece in half width wise (hot dog) and pin.
6) Mark 2" section on side of lining to leave unsewn.
7) Sew around the three sides (backstitch at beginning and ends), leaving open 2" gap in lining.
8) Clip corners and turn right side out. Press.
9) Hand sew or machine stitch opening with scant seam allowances or invisible stitch.
10) Push lining into outer fabric (using chopstick --or paintbrush handle lol), press, and enjoy!!
Here's the beautiful finished product! Katee and I finished from sketching it out to putting our glasses in, in about half an hour. Katee (age 10) sewed everything on hers by herself. I'll bet you can't guess which one above she made!

(Linked up here for Sew Modern Mondays)

Friday, January 7, 2011

Rosemarie & Katee with their quilts
Rosemarie and Katee with their quilts at Christmas!
(The above picture has nothing to do with this post)

No sewing happened today. I did however, try something totally new yesterday that I'll be posting as soon as I hand sew that binding down! It's little and cute, and I learned that maybe it would have been better if I wouldn't have gone all rogue and shrunk down the block size without testing the large size first. It's pretty cool though; stay tuned! 

I don't do this often... have you guys seen the work of Jolene over at Blue Elephant Stitches? WHOA! That's some seriously awesome sewing! I'd like to think that that's what my blog would look like if I had all the money in the world to buy fabric with... and all the long naptimes in the world to sew during... and a reason to make lots of quilts (the ability to feel ok charging someone for a quilt). Such great inspirational work there. Seriously, get a load of her "We love Grandma" pillow. Be still my heart! AMH, purple, and tiny handstiched words! :)

Tuesday, November 23, 2010

Fabric Tuesday!!!

 Some of you may recognise some blocks from this quilt -- since you made them! That's right, Rosemarie's Cancer Killing Quilt and Katee's matching one are very nearly finished!!! I was on a major time crunch to finish Katee's (it was just a strip of blocks and an idea a week ago), since she and I will be working on hand stitching the bindings down on these two this week at Thanksgiving! All I need to do before we leave at the crack of dawn tomorrow is sew on that binding to Katee's quilt! I hadn't been worying too much about getting Katee's done too, but then my mom (who watches Katee while her parents are away with Rosemarie for her treatments) mentioned that Katee's really excited to see her quilt! I couldn't let that sweet 10 year old down!

Stopping in for the first time and don't understand what I'm talking about? Here's the first post and all the others. The short end of the story is that my four year old niece has cancer. She's been battling for three years and it makes me crazy that there's nothing I can do to make it better. We've rallied the forces and people from all over the world (I think like 6 countries... though I'd have to go back and count) have sent me pink and purple quilt blocks to make her and her older sister (Katee) quilts (since of course you can't make something for one sister and not the other). This project has warmed my soul in ways I can't describe. You all are amazing!
 Here are those raw edges, soon to be covered over with binding! It looks great doesn't it? The bindings (and back of Katee's quilt) are very scrappy. I used up almost all of everything that people had so very generously sent along with the blocks. These quilts are going to make AWESOME Christmas gifts! :)

Don't forget to head over to Quiltstory to see all the other goodies linked up for fabric Tuesday!

Friday, November 5, 2010

Mug Rugs Again!


I've joined the second round of the Scrappy Mug Rug Swap. We have recently received our partners, and I'm all ready to get creating! The only thing is, I have a house guest sleeping in my sewing room! lol. Well we did manage to get to the Joann's (superstore) this week so I did pick out some cute Christmas-y fabric, including one of some sweet shoppers. I also (finally) have my hands on a couple yards of Kona Ash. It's been a long time coming for that! :) 

While I await the use of my sewing machine, I've been making some sketches of ideas for my partner's mug rug. I'm probably going to do one Christmas themed one and one regular one. We'll see... obviously last round I had a million in the works so I don't think sending two would be too much work!
And finally I'm starting to sew that binding down on Rosemarie's Quilt! I'm only going to do about half of the binding, then I'll bring it to Thanksgiving for my niece (Rosemarie's older sister Katee) to help me, she's awesome at sewing binding down! I figured it might be a nice sentiment for Katee to have a hand in this project as well. I'm making a bit of progress on Katee's quilt too - hopefully that will be nearly finished by thanksgiving too! Oh - and notice the raw edge up there, I stole this idea of writing prayers in the edges. I'm not sure who originally did it, or where I saw it... I'm pretty sure it was on the "Trudy's Arse Kicking Quilt" flickr group. It's a wonderful idea anyhow. I wrote this little prayer in the binding next to the block I made. Rosemarie will know she's not only wrapped in love with this quilt, but wrapped in prayer too!

Monday, October 25, 2010

A post to make up for my last one.

Last night I sat down and designed Katee's Quilt. I intend to finish both Rosemarie's Quilt and Katee's for Christmas. I'm going to make them each a matching pillow case too, and it's likely going to take me really buckling down to get it all done. I just haven't been very inspired on the bigger projects recently. If you don't remember, here's the link of posts about the Rosemarie Quilt, Katee's quilt is being made from the remaining blocks. Hers will have a touch more adult to it (more purples, more saturated colors). I'm planning on embroidering her name there on that strip on the side. I think it'll be sweet yet not baby sweet (since she's 10).

This was my sketch of ideas for my sewing machine cover. I decided on the two ideas that are circled, and then winged it from there. By the pictures it looks like it could be three different covers all together, but instead each side is mostly monochromatic.

Here's the blue side. My favorite side. All my fav. fabrics. AMH little folks and good folks, grey (duh) and also those little owlies are adorable.

Here's the pink side, which I love, but it's a bit more busy than I'd like. Yet again lots of AMH, even some Chocolate Lollipop in there. The black safety pin fabric is amazing and I'm almost out of it. The top panel is composed of random blocks from my scrap bin, including bikes, 1/4" patchwork, and grass green. It's a little out of place but, whatever.

Here's the reverse side. I made use of those few little hexies I made way back (before I decided I don't like hand sewing enough). They didn't match anything I had so I decided no harm in sewing them onto the back here. Grey matches everything.

Now I just have to go ahead and bind it up!

Sunday, August 8, 2010

Rosemarie's Quilt - update and housekeeping.

You guys rock!!! Check out all the blocks that have already been made (some of them already in the mail) for Rosemarie's quilt! There are quite a few more up already on the flickr page too! I can't believe how much response I've gotten with this project! You guys are all the best! I think that one of you guys said it best - in a flickr mail note, so often we hear about things like this (Rosemarie having cancer) and there's nothing we can do but feel sorry for the situation - at least this is something we can do! I couldn't agree more, I feel helpless in this battle - the doctors, they can do stuff. The most I can do is support Rosemarie's mom and dad and sister... and even then, I'm 300 miles from them. This is something I can do. :) Thank you for helping me!

Today is the three year anniversary of the day we found out that Rosemarie has cancer. It's hard to think that it's been that long. She had barely even learned to walk yet! On the bright side, for the first time ever this week's scans showed a slight decrease in cancer cells! Which at the very least means that she's not allergic to the new treatment! At best it means it could be working!!!! :)

***

Ok on to the housekeeping. I didn't really know what goals or plans to make when first starting the Rosemarie quilt project; now that I have a better idea of how things are going to work here's the game plan. I've already started receiving blocks (!!!) and will continue to take them for a couple weeks... once again I'm leaving this pretty open since I'd like anyone who'd like to help to be able to. I will be -for lack of better words- away from my sewing machine for a few days the week of Aug 16th, so I won't plan on sewing them all together until at least the week of the 23rd. Hopefully that gives you all plenty of time to submit blocks if you'd like to. My goal will be to get the blocks together into a quilt top during the last week of August (as I'm having sinus surgery - ugh - the first week of Sept.). Any extra blocks will be made into a matching quilt for Katee (Rosemarie's big sister), and depending on what the treatments are like for Rosemarie, I'll be kidnapping Katee to help in the assembly process. Any further blocks, should there be any remaining, will be added into a quilt to be raffled off for Rosemarie, or for a Project Linus quilt.

I hope I've covered all the bases here. Please let me know if I forgot anything, or if you've got a question (or still need my address). Thanks guys!!

And in parting --- Pics of the first package of blocks I received yesterday!!

Wednesday, August 4, 2010

Rosemarie's Cancer Killin' Quilt - Please help!

Ever since a few weeks ago, when I was teaching my niece Katee (10) more about sewing/quilting the thought keeps popping into my mind that Katee and I should work together on a quilt for her little sister, Rosemarie. Rosemarie is four years old, and she has been fighting cancer since she was just a year old. She's been through numerous rounds of chemo, radiation, several surgeries, a stem cell harvest, stem cell transplants, bone marrow transplants, an MIBG therapy, and now is in a stage one study. In this new study she's being seen at the children's hospital in Cincinnati Ohio, which is several hours from home.

Well, while I keep returning to the thought of making Rosemarie (Ro-ro as my daughter calls her) a quilt, I came across a group on flickr asking for help in a similar task, making a spirit lifting - cancer kicking quilt. :) I've seen the great response that Lucia from lulubloom has gotten from her flickr group, Trudy's Arse Kicking Quilt so I'm going to see what response I might get for some help in making the warmest sweetest, anti-cancer quilt eve.
Here is what kind of blocks I'm looking for:
  • Size: 9" square (8.5" finished)
  • Color: pinks and/or purples (girly)
  • Style: either cross / plus (wonky, squared up, pieced, single, multiple)
  • or square in square.
Here's the flickr group link. Please feel free to share this with anyone and everyone... and please say a prayer for Rosemarie!
Here's a link for more info on Rosemarie.

Feel free to email me/comment here if you'd like more info or my address to send to.
Thank you crafty blogger/flickr friends!

Friday, July 23, 2010

Tutorial: Sewing School (one thing, one week challenge)


Accepting the challenge given by Amy, from Amy's Creative Side.
This week we had my niece Katee in town with us. She's ten and has sewn with me on two or three occasions before. For her recent birthday Wally and I got her all the necessary sewing supplies to get started (minus the sewing machine). While I wanted to give her my old White sewing machine, my sister decided she'd rather Katee use her machine (the same as my old Singer)... since of course if Katee ran into any problems my sis would be much more likely to understand how to fix them. So, with the understanding that when she returned home she could set up her mom's sewing machine on the auxiliary dinning room table, we got to work! Here's a breakdown of what we learned etc.

I'd recommend dueling sewing machines for this project... side by side so that the student can really do it all by themselves. Prior to this week, my niece had completed two projects, both using a sewing machine sewing strait lines only, each time following instructions with an example before each step. Hardly independent sewing, so this was done in the hopes of getting her much more comfortable with sewing without me there with her.

Step 1: Machine parts and function.
  • Machine parts: stitch length, stitch width, backstitch button, bobbin winder, presser foot, needle, feed dogs, bobbin.
  • Machine threading.
  • Bobbin winding and threading.
Step 2: Basic skills. Practiced by sewing a basic 9 patch.
  • Sewing with a 1/4 inch seam allowance.
  • Pinning seams.
  • Ironing.
  • Chain piecing.
Step 3: First project, simple potholders.

  • Measuring fabric with ruler/pen.
  • Cutting precisely.
  • Pinning (prepared for the "inside out/pillow case/birthing method").
  • Sewing around the outside, keeping needle down at corners to turn fabric.
  • Leaving an opening for turning inside out.
  • Clipping corners.
  • Turning inside out/poking out corners.
  • Top-stitching around entire outside and closing up the opening.
  • Quilting an "X" on the top, through all layers.
Step 3: Taking what we learned to make another similar project.
  • We used this method to make a small needle book for travel. A basic pillowcase method project, with the addition of a loop for hooking onto a bag or purse, and Velcro sewed on using a zig-zag stitch.
Step 4: A more complex project, pieced potholders bound traditionally.
  • Using pre-cut 2" strips to make a log cabin block.
  • Ironing seams to the side
  • Keeping seams even throughout the project.
  • Choosing colors for fabric.
  • Pinning the quilt sandwich.
  • Quilting across in an "X" pattern.
  • Preparing a strip for single fold binding.
  • Sewing the binding strip on the front mitering corners.
  • Hand sewing the binding to the back, mitering corners.