Showing posts with label tutorial. Show all posts

Thursday, October 23, 2014

How to run a successful swap

I'm not going to claim to be an expert swap mama, but sometimes it's good to know a few things before deciding to host a sewing swap. Here's a little post about what I know (29 swaps worth of experience!). Please feel free to add comments at the end with any additional suggestions!

Before starting a swap you'll want to think about a few things, what sort of swap will it be? Is this for anyone to join, or just people you know and trust? Is it going to be a quick swap, or one that spans several months?

At the bare minimum you'll want to have the basic info covered BEFORE posting a signup.

  1. Who - will the swap be limited to Instagram people, limited to flickr users, limited to people you know locally? Be sure to be clear - if you don't want Suzie who is not a regular internet user - then say so in the beginning. If you want active swappers you might consider limiting it to one site - IG or Flickr.
  2. What - What will you swap? Be as specific as possible (for example: One medium pouch, no extras required). Be upfront if you're expecting people to send a bunch of extras - some people prefer to send just handmade things.
  3. Where - Will the swap be hosted on flickr or Instagram or both? Can I sign up if I don't regularly visit any social media? Do I need to be active? You can request swappers to check in / comment on photos once a week - encourage them to encourage each other. Everyone loves a chatty swap partner.
  4. When - Give us a timeline. When will the signups start/end. When will you send out partner info, what is the deadline for mailing. For longer swaps you may want to set a "don't mail before" date too.
The above info should be posted when signups are opened. Include this info in the important "partner email" too for easy reference.

Some additional things to keep in mind:
  • Swap mamas - You'll want some help with this. Ask a couple people you trust (hopefully ones who have previous swapping experience). Communicate either by private flickr group, google docs, or a group email. 
  • How many swappers to allow? This is all up to you, but in my experience having no more than 10 swappers per swap mama is ideal. For a quick matched swap maybe 15 swappers per swap mama. Most swaps would be good to be capped at 100 swappers... it gets awfully hard to keep track of everyone once the swap grows so huge. If you're an expert swap mama then trust your judgement. If you're a newbie swap mama, then try for 30 - 50 swappers. Smaller is easier.
  • Quick and easy vs partners matched carefully. Many swaps are more of a "you get what you get" when it comes to partner pairing. I find that swaps are a lot more fun if I know the person I'm swapping with, or if I share similar style / likes with my partner. This takes more time for the swap mamas to pair up partners, but it's worth it. It is especially helpful to pair people up by their style for longer running swaps. By pairing by style it helps swappers to feel confident in their end product - they can stay closer to their own comfort zone. (insiders' info: when I sit down to pair up partners for Doll Quilt Swap, it takes a couple hours of pouring over my group's feeds, and taking notes about skill, color style, and modern vs traditional). For shorter swaps (or swaps that are for a small item / quick item) it's just as well to pair randomly. 
  • Communication - it is important for swappers to know that they are expected to reply to all emails from their swap mama. Being open and upfront about these thing will help swappers stay on track (and it'll keep you from having people flake out at the last minute). For longer swaps it's good to have the swap mamas communicate with their swappers once a month (at least once in the middle of the swap for shorter swaps). This gives the swapper the comfort of being able to say that they need more time / will send late / can't follow through on the commitment. It's easier to handle these things mid-swap. Swap mamas should keep track of this communication - if you notice one swapper who doesn't reply keep hounding them - nothing is worse than a swapper going AWOL and leaving their partner with nothing. 
  • Deadlines are to be broken? Be clear about what is expected. Generally it's a good rule to say that if you mail late this time, you can't swap next time. A late sender will have to sit the next round out. There is always an exception to the rule, but be clear that it's better to be in contact with your swap mama about sending late. 
  • The swapper who refuses to communicate - there's always one. You email, they don't email back. It takes them ages to post a progress pic, etc. Beware. Sometimes this is just a case of being busy, but a swapper who doesn't communicate is much more likely to flake on the swap. Be persistent. 
  • Timelines - Small swaps (one item, small item, holiday themed, color themed) are great for 4-6 week swaps. No big commitment. For larger swaps (doll quilt, purse/bag, multiple item, more personal) 2-3 months is good.
  • Lottery - The lottery system is good for larger swaps. Here's how that works: everyone signs up via google forms - the swap mama's look at each signup and OK each swapper (no late sending last time, regular posting on their IG/flickr, etc). If signups surpass the number of swappers allowed then you'll pull names from the list of signups who have been OK'd. This allows you to gently decline a swapper who just isn't ready for a big swap / who has burned the group before by not sending / who is negative in the group / etc. I wish this method weren't necessary, but it's a good protection should you need to say "no thanks" to someone who signs up. 
  • International swapping - International swapping is so much fun! Who doesn't love to receive international mail? But - international mailing is EXPENSIVE. Please please please give swappers a spot on your signup list to request a USA only partner. I personally have to edit what I can send because I'm not willing to spend more than $20 on postage. Take a look, anything more than a flat rate envelope is more than $20 out of country. In my experience it doesn't add much work for the swap mamas to match partners to those of their own country when necessary. For swappers outside of the US, they have less chance of getting a partner in their country - I think they're aware of that. I offer "USA only", and "I'll ship anywhere" for swaps I run.
  • Extras - even if you tell people that extras aren't required, you'll still have people who send them. If you require people to send extras give them an idea of what is expected "one small handmade item (pincushion, needlebook, etc), and a treat" or "a favorite notion and two FQ's." People will still go way above and beyond, but they will not feel required to do so. 
  • Angels - even the best run swaps have some flakes. If someone flakes out and doesn't send their swap package, have a couple people on hand who are willing to be "angel quilters" - to make a swap package for the person who's partner flaked out. If it's a quick / smaller swap you can announce at the beginning that there will be no angels - meaning that if someone flakes out you aren't responsible for finding an angel. For larger / longer swaps it's good to have a couple people ready for this task. If you don't know of anyone willing, announce it to the group - usually someone will step forward and be willing to help. 
Swap mama tools
  • google forms / google spreadsheet - poke around on google drive. There is an option to "create form" That is the questionaire. Include all your required questions. Then click on "Responses" on the top task bar -- that's how you'll set it to send all the responses into a google spreadsheet. Easy. If you have trouble setting this up let me know... I'll do my best to answer any specific questions. Example of a swap signup google form is below (feel free to enter random stuff into the categories and hit send - then I can show you the spreadsheet too).
  • Swap List - (pictured below) this is used to keep track of one swap mama's bebe's. It's a quick at-a-glance way to keep track of the important stuff.
  • sample emails - I have sample emails saved for basic "swap partner email" emails - if you need some help formulating I can send you a sample. 


Swap List

Thursday, February 27, 2014

Hope NICU Quilt for Benartex


I'm guest posting on the Benartex blog today!

Once it's all quilted up I'll be donating it to my local Neonatal Intensive Care Unit (NICU) - so it can bring some hope to a baby in need of a bit of hope! 


Doodle Dog Fabrics
You've got a chance to win a fat quarter bundle of the Doodle Dog collection that I used for my quilt. There are three chances to enter:

1. Sign up to follow Benartex's blog, either via email or a blog reader program like Bloglovin' (both on the righthand sidebar of the blog). Leave a comment letting me know you did so. 

2. "Like" Benartex on Facebook and leave a comment letting me know you did so. 3. Follow Mommy's Nap Time and leave a comment letting me know you did so.

This giveaway is open through Sunday, March 2 at 11:59 PM EST. 

Tuesday, February 18, 2014

Covered Seam Finishing Tutorial: The Aragon Bag

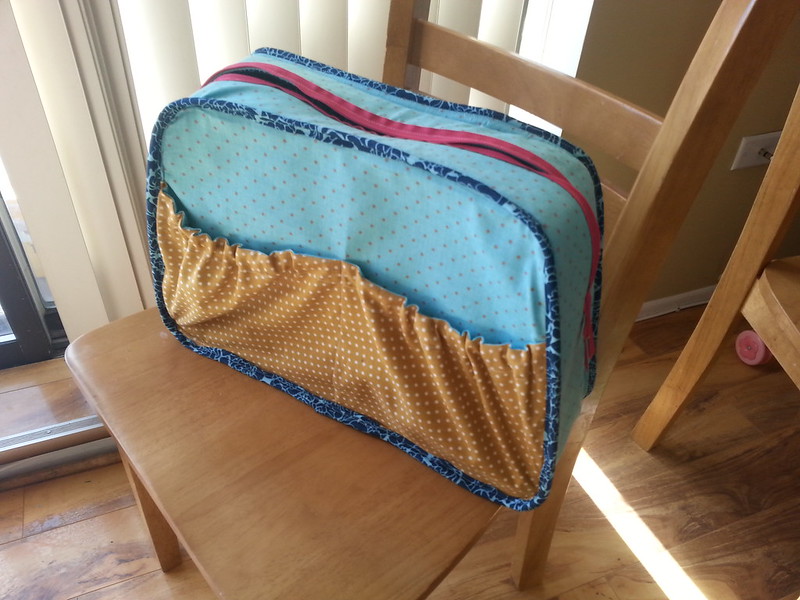
Aragon Bag!!

Last month my guild hosted Sara Lawson for a workshop on her Aragon Bag. It was a really fantastic workshop and I was lucky enough to be the guild appointed "helper" for the workshop. So I made my bag ahead of time and came to the meeting prepared to help wherever needed - fusing interfacing, assuring people that they did indeed have it put together right, etc. It was pretty fun! 
Of course I made the Aragon bag ahead of time - and it came together so nicely! I can't even begin to tell you just how smoothly - I didn't swear or anything! I'm so proud of how polished this bag is! There were some major Aha! moments throughout - points where I read the step and couldn't imagine a better way to do the step - it all fit together so nicely - all the little details!

So, on to the bag. I had finished my bag before the workshop - all but the bias binding around the inside raw edges. Ugh. That part... I don't like hand sewing. My hands don't like hand sewing... so I devised a plan to not sew that by hand - and it worked!! Here's how:

Covered seam finishing mini tutorial:
Materials needed:
Fabric
Iron

Bias tape, folded in half.

First make yourself some bias tape - it really does need to be on the bias!
Cut your strips 2 1/2" wide (cut as many yards as the pattern calls for). 

Next press the strip in half right sides together. 

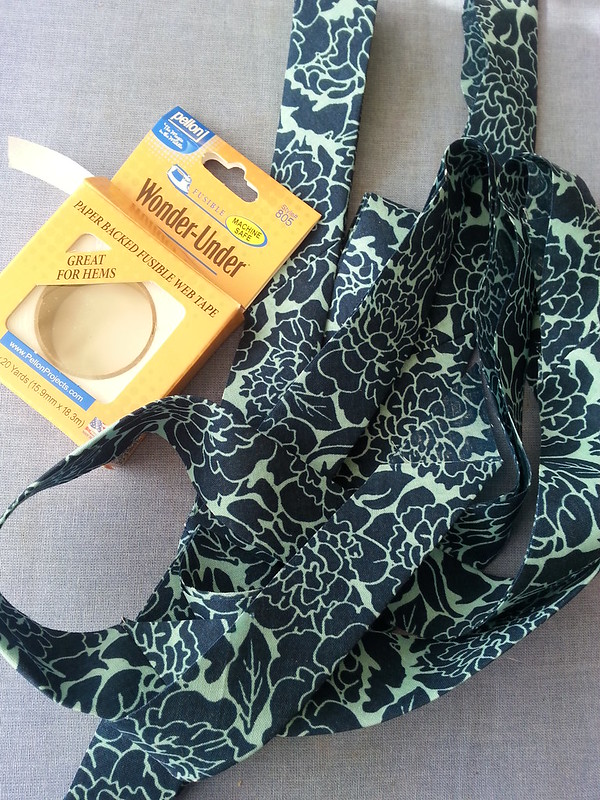
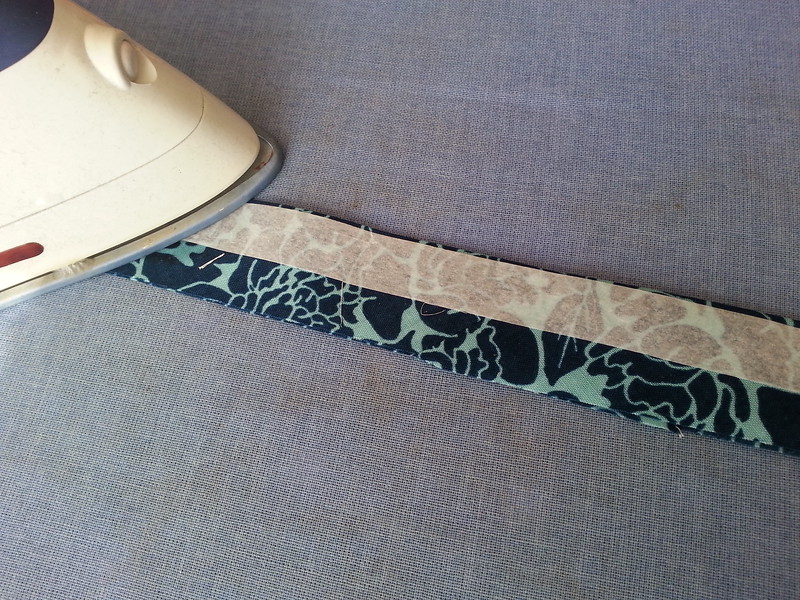
Fuse the wonder under along the folded edge.

Then lay the Wonder Under tape along the folded edge (on the right side of the fabric) and press it (according to the directions) along the entire length of the bias tape.

Leaving the paper in tact sew the raw edge (paper side up) along one side of your seam. I used a ton of clover binding clips to hold it in place.

Carefully press.

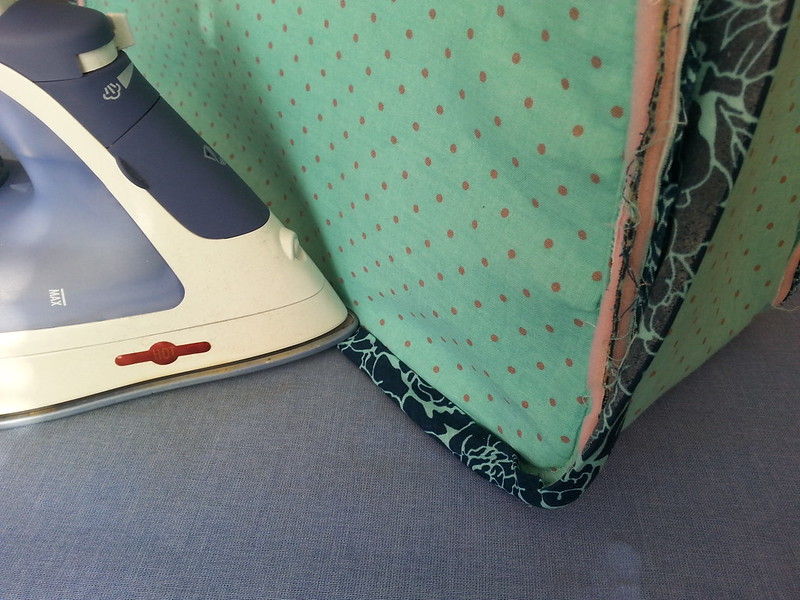
Peel off the paper and carefully press the bias tape over and around the raw edge seam. Use an occasional clover binding clip to secure the binding to the edge long enough for the Wonder Under to cool. Be sure to pull the bias tape taught enough that it covers past the seam line. (tip, in a few places I found it necessary to trim the seam allowance down just a bit).

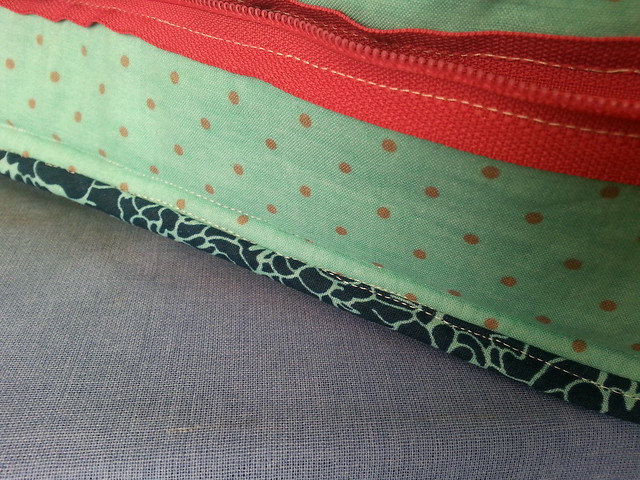
Image from the folded edge side.

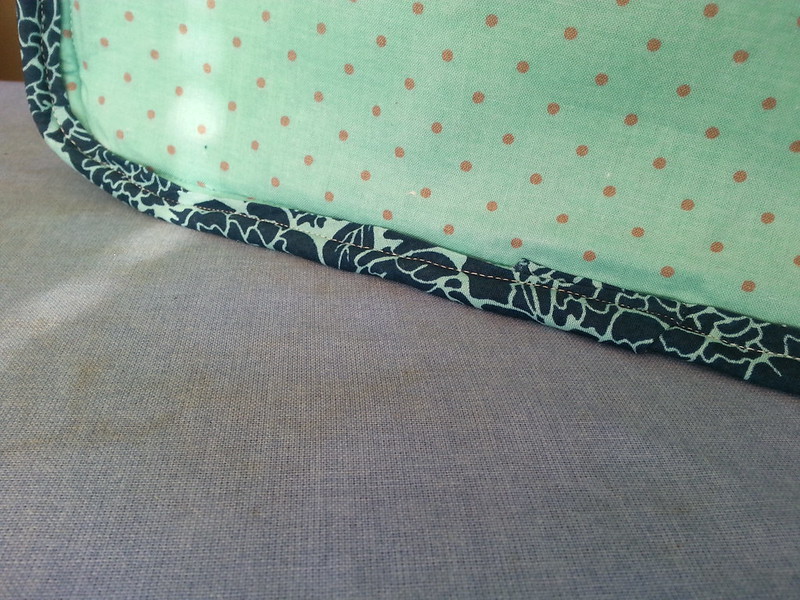
Carefully sew along the folded edge. 

Image from the opposite side. It doesn't matter much if your seams are perfect - covered is all you're looking for.


Tada! Completely machine sewn covered seams! 

Completely covered in so little time! 

I really enjoyed sewing this Aragon Bag and now I'm able to say that all along I was making it for m mom! She came to visit last weekend and she had no idea that the bag was for her!! Happy early (early) mother's day Mom!! 


Wednesday, December 18, 2013

Christmas Half Square Triangle Zip Pouch Tutorial!


As a part of Pellon's Handmade Holiday series, my brand new tutorial is available for download on Pellon's projects page! I'm pretty excited about this one. The colors are just perfect - and I just adore adding tiny piecing on projects! 


Everyone could use a pretty little zip pouch so head on over and get the download!

Sunday, November 3, 2013

I'm on Quilty!!

Remember way back in June when I mentioned taping for Quilty? Well the first of my two videos is up on the QNNTV site! Go check it out and learn how to make some pockets for your gift cards!


By the way - how cool is it to see my quilt in the background - hanging on the Quilty set??!!

Friday, May 24, 2013

Summertime Stay Dry Pouch Tutorial

stay dry pouch


Summertime is on it's way (finally!). Of course my summer needs require a safe spot to stash my daughter's hearing aids while she runs through the sprinkler, or plays at the splash area at the local park. So, here you have a "splash proof" pouch. No it's not 100% water proof - but it's water resistant enough that your stuff won't get ruined if you throw a soggy towel on top of it. I've made this pouch to be roughly the size of an Iphone - I'll have to track down a tech savvy friend to see if it does indeed fit!


Final measurements: 5.75" x 3.5" (flat)


Supplied needed:
  • 7.5" x 6.5" Laminated cotton fabric (or oilcloth)
  • 7" (or longer) zipper
  • 2.5" x 2.5" cotton fabric for pull loop / key ring loop
Prepare key ring loop:
(essentially we're making a bit of binding tape here - feel free to use a leftover scrap from another project, or a bit of ribbon - otherwise prepare the loop as follows.)

Fold 2.5" x 2.5" fabric in half and press with an iron. 


Open up the fabric then fold each side down to the center fold and press. 


Re-fold the center fold and press. 


Sew 1/8" along both long sides to enclose the raw edges. 
(I opted to do double rows of stitching here)


Fold in half (short, raw edges together) and press.

Baste along the raw edges about 1/8" from the raw edge and set aside.

Assemble the pouch:

(Use your zipper foot attachment for the following steps)


lay the zipper along the 6.5" side of the laminated cotton fabric, right sides together, sew the zipper in place using a 1/4" seam allowance. (the zipper may slide around a bit, if you're having trouble keeping it all together use a bit of masking tape to hold it in place)

Fold the zipper back so that the seam allowances are away from the zipper. Finger press this fold (don't press with an iron, it'll melt your laminate fabric!)


Topstitch along the zipper 1/8" from the edge of the fabric.


Unzip the zipper and repeat these steps using the other 6.5" side of the fabric.

(Switch back to the regular presser foot for the rest of the project.)


Zip the zipper partway (leaving at least 3-4" open) and turn so that the wrong side is facing out.


Fold so that the top fold is about 3/4" from the zipper teeth. (finger press a crease at the top and bottom.) 

Insert pull tab under open end of the zipper.

Insert the zipper pull tab centered under the open end of the zipper. The fold of the pull tab will be on the inside of the pouch, and the raw / basted edge will be aligned with the raw edge of the side of the pouch. 

Baste pull tab into place using 1/4" seam allowances.

Sew along both open sizes of the pouch using a 1/4" seam allowance. Back stitch at the beginning and end of the seams, reinforce the ends of the zipper by sewing over that area twice.


Trim the excess length of the zipper, and clip corners.


Turn pouch right side out and enjoy!


Tuesday, October 23, 2012

Sweet & Tiny Keychain - My New Pellon Project!

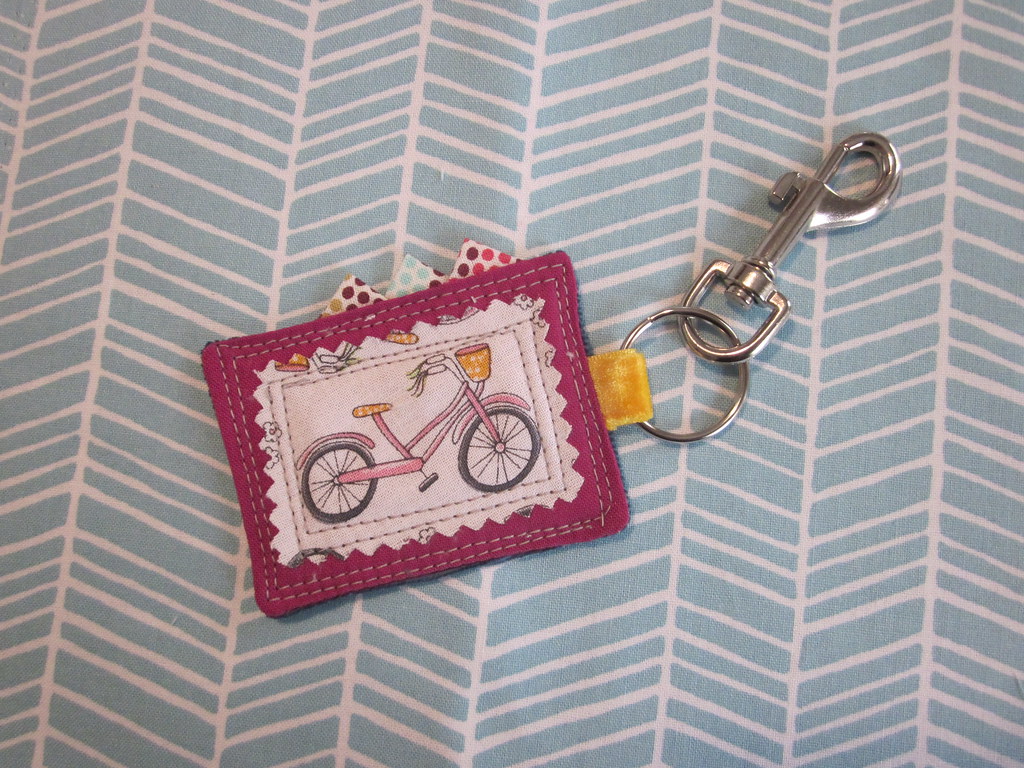
Check it out! The instructions for my tiny keychain are now available for free download on Pellon's website! 

christmas gift

These little things take just a little fabric and a little time - they'd be perfect to add to your Christmas gifts! 

bike keychain

I've made a few of these now, and by far that one at the top is my favorite! I really love the punch of that AMH ribbon! 

bike keychain

If you're lucky enough to be going to Quilt Market this weekend stop by Pellon's booth and you just might see these little keychains there! Take a picture of them for me - it's my first time of having something made by me at Market! :) 

Thursday, October 11, 2012

Cathedral Window QAL: Block Four

Click here for more info about the QAL!

I can't believe we're already nearing the halfway point of the Cathedral Window QAL! Here is my contribution, the Opposing Waves block! 


I  had a lot of fun putting together this block. I cut the pieces at a slight bias for extra curve, although that step isn't entirely necessary it will give your waves a more dramatic effect. The fabrics I used were Kona Curry, and Kaffe Fassett Shot Cotton in Lichen and Moor. The shot cottons look really amazing in this block, although it is hard to take pictures of that amazingness!


Block size: 12 ½ ” x 12 ½ ” unfinished

Fabric Requirements:
8” x 14” of three fabrics
5 ½ ” x 12 ½ ” of one fabric

The green fabric pictured here is 8" x 14"
The purple fabric is where you would trim down to get your "bias cut" pieces.
From each of the three 8” x 14” pieces cut a 5 ½ ” x 12 ½ ” rectangle at an angle so that the corners of the ruler are on the edges of the 8” x 14” piece. This will provide a slightly biased edge without wasting too much fabric.  


Take one bias cut 5 ½ ” x 12 ½ ” rectangle. Fold one 12 ½ ” edge back 1” and press.
Repeat on the other two bias cut rectangles. Leave the straight cut 5 ½ ” x 12 ½ ” rectangle flat; this will be the base fabric.


Lay one bias cut rectangle on top of the base fabric so they overlap by 1” on the long side. Align the raw edges of the two pieces with the fold of the bias rectangle on top. 
Repeat using a second bias rectangle on the opposite side of the base fabric.
Repeat again on the second side of one of the bias pieces.

All layers in order, marked, and stitched along the lines.
Pin all layers together, and use a disappearing fabric pen to mark the following horizontal lines across all the pieces:
·         ¼” from bottom
·         4 ¼” from bottom
·         8 ¼” from bottom
·         ¼” from top

Carefully sew along each of these marked lines.


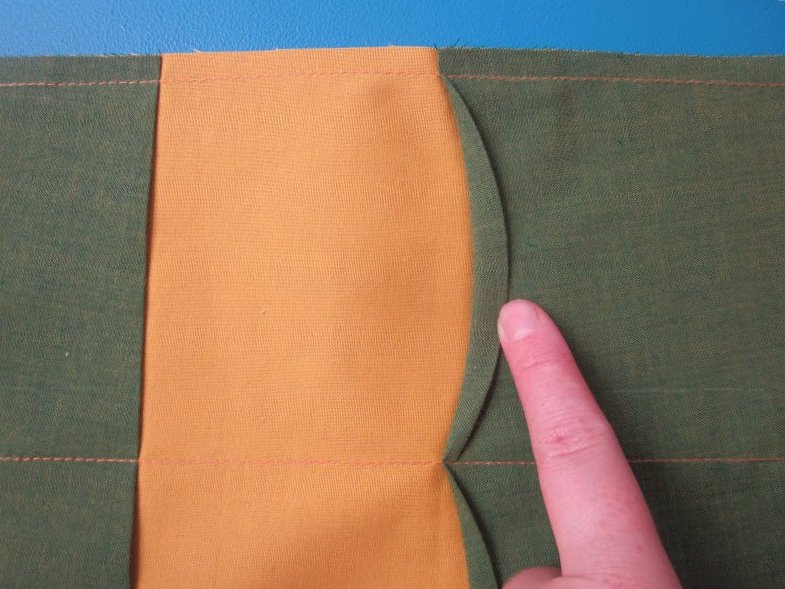
Press the vertical fold between each of the lines away from the base fabric. The bias edge will curve gently. Each curve should be approximately ½” at the widest part. Press the curve into place.


Press one vertical row then top-stitch the curve close to the folded edge. Repeat for all rows.


Trim block to 12 ½ “ x 12 ½ “


If you make one of these be sure to add it to the Cathedral Window QAL Flickr page and you may win one of the fabulous prizes! And as always, if you make a block using this tutorial I'd love to see it! Add it to my Flickr group too!

***

Wednesday, September 26, 2012

HOPE Mug Cozy

September is childhood cancer awareness month. This project has been knocking around my head all month. I wanted to make a small project to remind me and others to remain hopeful in these rough times.


Rough times you ask? My niece Rosemarie has cancer. She's six years old and has been fighting since she was 13 mos old. She's done surgeries, had countless rounds of chemo and radiation, she's had bone marrow transplants and stem cell transplants. She's been on crazy new-fangled radioactive treatments, treatments that have made her sick and cough and loose her hair. She's missed school, and she's missed out on holidays. Does that stop her? Of course it doesn't. It's hard to think about, but there is no cure for Rosemarie's cancer. Neuroblastoma has no cure.

I feel helpless in the fight for childhood cancer awareness. I don't have the money personally to fund a research team. I don't have the fame to spread the word across the world. But I do have this little blog. So here's my gift to you, and a plea for help in this battle against childhood cancer.

My gift is a sweet tutorial for a little mug cozy. It can be used in your home or office, using any old standard mug (we all have some hideous ones don't we?). You can customize this mug cozy any way you want - make it patchworky, make it all one color! Mine says "Hope" since in the fight against cancer that's what we have to cling to. Mine is also yellow (Kona Curry) - since Gold is the color for childhood cancer awareness - and I don't have any blingy gold fabric.

At the end of this tutorial is the link to St Jude Children's Hospital** I'm asking that if you pin this tutorial, bookmark it for later use, print it out, use it, share it, etc - consider dropping a dollar in donation to St Jude (by all means donate more if you're able!). As we share our creativity we can also help fight childhood cancer.

HOPE Mug Cozy:


Materials:
3" x 13.5" scrap of two fabrics
3" x 13.5 scrap of Pellon 905 Fusible Fleece or batting.
1" x 1" scraps of four fabrics for letters
scraps of Pellon 805 Wonder Under & Wonder Under Tape
Velcro


Step 1
Cut 3" x 13.5" from the outer fabric. Mark and trim 3" x 1/2" from the top and bottom edge of one end. Repeat using lining fabric.

Step 2
On the paper side of the Wonder Under draw four 1" squares. Draw letter H on the paper side of the Wonder Under, inside one 1" square. Repeat for other letters being sure to reverse the direction of the letters (the P was the only one I had to worry about - I simply drew the P on the glue side of the Wonder Under).

Cut out the 1" squares and fuse onto the wrong side of the four scraps. Be sure to fuse it properly (use a damp pressing cloth and press until the cloth is dry). Cut out around each letter, and remove the backing paper.

Step 3
Fuse the letters in place on the outer fabric. Add lines of vertical top stitching on top of the letters. They will fray a bit with use, this stitching will hold them in place.

Step 4
Layer linging fabric (right side up), outer fabric (right side down), batting  - and pin in place. (If using Fusible Fleece, first fuse it to the wrong side of the outer fabric. I didn't have a scrap large enough to use it, but the Fusible Fleece would not shift like my batting did!)

Sew around all edges using a 1/4" seam allowance, leaving a 2.5" - 3" gap for turning.

Press the turning gap open and add a strip of Wonder Under tape on one side of the turning gap. Press into place and remove the paper backing. This piece will help secure the opening neatly while top stitching the gap closed.

Clip corners close to stitching and clip at the concave corners too. Turn inside out, press, and top stitch.


Step 5
Wrap your mug cozy around the mug, measure how much the tab overlaps the main piece, and cut the velcro to that length - mine was about 2".

Pin velcro in place and top stitch it in place. Add a box stitch for extra security.

Put the cozy on your mug and enjoy!!


Thanks for sewing along! Please make a donation to St. Jude's! I'd love it if every person who uses or saves this tutorial would donate $1 to St Jude. Do it for Rosemarie! Thanks!!

**St Jude's is currently doing active research on NEW treatments for Neuroblastoma.

Tuesday, September 25, 2012

Whoa Whoa! My first Pellon Project!

Today my very first Pellon Project went up on their website! I'm so excited to share my Bubble Pillow with you!

Bubble Pillow
The prototype for this pillow was gifted to my cousin's baby Chloe (ok - Chloe is less baby, more toddler now). I love the finished product - so cozy! Make one for yourself, or for a friend! Go ahead and snag the free download here on Pellon's site!

I hope you're as excited about this as I am! If you make a Bubble Pillow I'd love to see it! Drop me a line here or add your pics to my flickr group! Happy Sewing!!

Monday, August 13, 2012

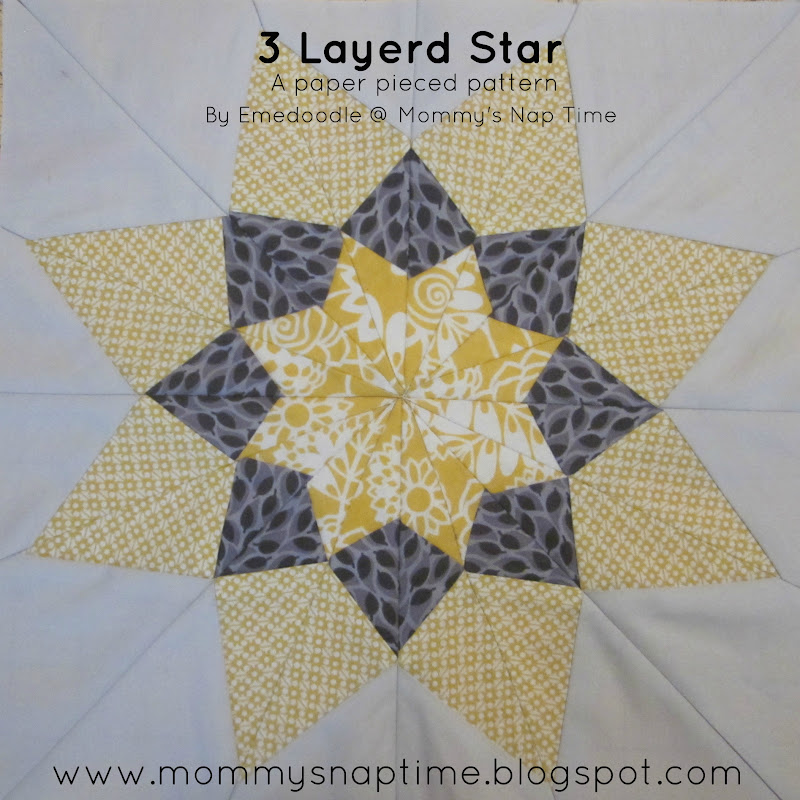
{Sew} Beautiful Bee - Paper Pieced 3 Layered Star & Tutorial

Last night (last week) I broke down and finally started on my July Bee block. I've had it in my mind for a while, but was deciding whether I should draft the one I wanted to make, or take the easy way out (easy?) and use a pattern that I could just print out.


I decided it was worth the effort, so I broke out the freezer paper and drafted paper patterns for this star. In a stroke of genious I realized that I could simply print copies of the pattern using my printer/scanner. I guess I could have used the other method (I can't find a proper tutorial for it, and have no idea where I learned it). For the other method, print one copy of the pattern and then staple a few sheets of paper together with the pattern on top. Then simply sew over the pattern lines with your machine using a long stitch and no thread (no thread!!) this will make several identical copies of your pattern. So easy!

Alright, I managed to get the pieced sections done (all 16 of them). It really was a struggle to get all the sections pieced out of the fabric Kati sent - since I didn't plan that part ahead! I did manage to finish one quadrant of it, and will finish sewing those sections together today! It's finished!

I'm calling this star a 3 layered star, since I think of it as being three different sized stars that are stacked. (and because I'm too busy to think of a cooler name for it.

Stats: 12" finished
Made for: Kati / From the blue chair
Pattern: drawn by me, maybe I'll share it later this week. Here it is!

Free paper piecing pattern here

Instructions:
Download image from googledocs.
Open using Microsoft Office, and print as "Full page fax" (no margins etc)
Double check that the square at the top of the print out is 1".


  • Cut along the outer lines, and across the three diagonal lines (at the arrows) 
  • Sew pieces in order 1-4 leaving 1/4" seam allowance around the outside of the paper pattern.
  • Use the same fabric for each number (in my example 1 is bright yellow, 2 is dark grey, 3 is light yellow, 4 is light grey)
  • Trim sections leaving 1/4" around all sides
  • Sew sections together in order. 
  • Four of these blocks will make one 12" finished block (12.5" before sewing full stars together)

Enjoy! If you use this pattern I'd love to see it! Feel free to drop me a line, and add it to the Mommy's Nap Time flickr group!

Wednesday, May 9, 2012

FQS Bella Parade 2 - How - to Pinterest


Are you ready for some solid loving fun? We are gearing up for the Fat Quarter Shop Bella Solids Parade Season 2 (May 21 - June 23) - join with us to find inspiration from our solids! 

Like last year we'll have a bit of a challenge and a chance to win a yard of the "fabric of the day," and also to enter to win the weekly drawing of a fat quarter bundle of the Moda Bella Solids 2012 line! Yes, that's a FQ bundle each week, 5 in total! Here's what you'll need to do to be in the drawing:

Each day we'll highlight a different one of the new Bella Solids colors - you'll then grab your camera (or cell phone!) and take pictures featuring the color of the day (this must be sewing related, but doesn't have to be of the fabric itself. It can be a project you made using the color of the day or notions, etc.)

You'll then pin those pictures on Pinterest - to a board titled, "FQS Bella Parade: Season 2" and you'll caption the photos.

First we'll all need to be on the same page with technology. 

The method we'll be using to keep track of your projects for the Bella Parade 2 will be Pinterest. For those of you who aren't familiar with Pinterest go on and check it out (www.pinterest.com). Sign up* for an account and add your Bella Parade board by clicking on the "Add+" button on the upper right corner.


A window will open with the options


Click "Create a Board." Title the board "FQS Bella Parade: Season 2" and click "create board." 

Pretty easy right?

Now each day of the Bella Parade you'll take pictures which include sewing related things using the color of the day. Using Pinterest you can add those pictures to your Bella Parade board. This is how:

For a picture that you have saved to your computer:
1. Sign in on Pinterest and click the "Add+" button.
2. This time click the "upload a pin" option.
3. Click "choose file" and open the file.
4. Select your Bella Parade board in the scroll down menu, and title the photo
(using the date and the name of the color of the day).


5. Click "Pin it" and you're done! 

You can also pin your photos that you've shared on your blog or flickr by using the "pin it" button on your taskbar, but do remember to give it a title!

I promise it's not that hard! Give it a try - get familar with how pinterest works. Remember though for our purposes the pins to your Bella Parade board should all be images taken yourself, with your camera. 

The final step will be to leave a comment (with the URL of your Bella Parade pinterest board) on the "Color of the day" blog post for that day on Shruti or I's blog. This is how we'll keep track of who's in the running for the drawings!!

**if you need an "invite" to pinterest leave your email in the comments (or email us directly) you'll get your invite within minutes of us submitting it. **