Showing posts with label pellon project. Show all posts

Wednesday, December 18, 2013

Christmas Half Square Triangle Zip Pouch Tutorial!


As a part of Pellon's Handmade Holiday series, my brand new tutorial is available for download on Pellon's projects page! I'm pretty excited about this one. The colors are just perfect - and I just adore adding tiny piecing on projects! 


Everyone could use a pretty little zip pouch so head on over and get the download!

Saturday, July 6, 2013

Did you remember the interfacing?


Just a quick PSA for you guys! Stop by your local Joann's and you might just see one of my projects! Two of the new Pellon products will feature pics of my projects on the packaging cover!


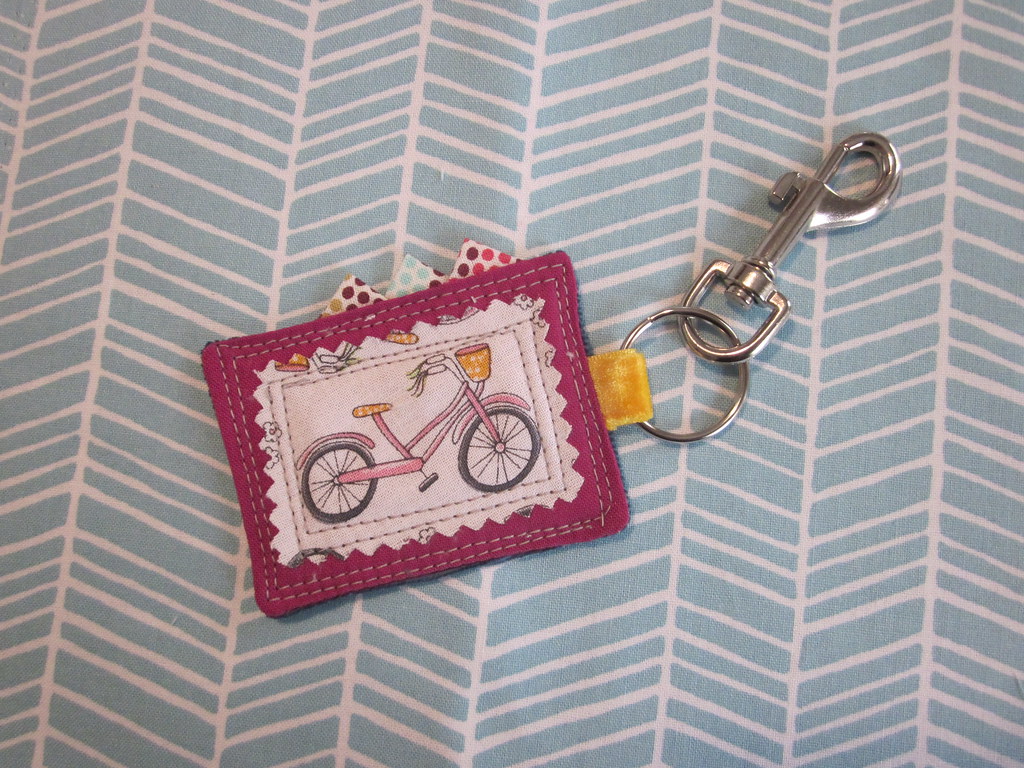
See? That's me, the bicycle keychain (bottom right). I'm way excited about this! My mom was in town when I went to see it for myself - and she was so adorable saying "I think I'll buy one just to show my co-workers!" lol Mom! 

I haven't seen it in stores yet, but my Bubble Pillow graces the cover of another product package too!


And last but not least - these cute project sheets will be on the Pellon displays at Joann's soon (I really have no idea when, but they're coming!). I'm pretty sure I'll geek out and tell all the fabric cutters at my Joann's when I see those project cards! :) 


Stop by Pellon's Project Page to see more of my projects. 

Friday, November 2, 2012

Hey Guys... I was at Quilt Market!

Ok... so in truth just a teeny thing that I made was at Market! 

key fob

The keychains I made for a Pellon tutorial (find the tutorial here) were displayed in the Pellon booth at Quilt Market! That's pretty darn cool!

key fob bike

Don't they look so cute there? It makes me want to make more of them... I'm pretty sure I know some people who are getting them for Christmas!

Thanks Charlotte for taking pics of these for me! You're the best!

Tuesday, October 23, 2012

Sweet & Tiny Keychain - My New Pellon Project!

Check it out! The instructions for my tiny keychain are now available for free download on Pellon's website! 

christmas gift

These little things take just a little fabric and a little time - they'd be perfect to add to your Christmas gifts! 

bike keychain

I've made a few of these now, and by far that one at the top is my favorite! I really love the punch of that AMH ribbon! 

bike keychain

If you're lucky enough to be going to Quilt Market this weekend stop by Pellon's booth and you just might see these little keychains there! Take a picture of them for me - it's my first time of having something made by me at Market! :) 

Thursday, October 11, 2012

Cathedral Window QAL: Block Four

Click here for more info about the QAL!

I can't believe we're already nearing the halfway point of the Cathedral Window QAL! Here is my contribution, the Opposing Waves block! 


I  had a lot of fun putting together this block. I cut the pieces at a slight bias for extra curve, although that step isn't entirely necessary it will give your waves a more dramatic effect. The fabrics I used were Kona Curry, and Kaffe Fassett Shot Cotton in Lichen and Moor. The shot cottons look really amazing in this block, although it is hard to take pictures of that amazingness!


Block size: 12 ½ ” x 12 ½ ” unfinished

Fabric Requirements:
8” x 14” of three fabrics
5 ½ ” x 12 ½ ” of one fabric

The green fabric pictured here is 8" x 14"
The purple fabric is where you would trim down to get your "bias cut" pieces.
From each of the three 8” x 14” pieces cut a 5 ½ ” x 12 ½ ” rectangle at an angle so that the corners of the ruler are on the edges of the 8” x 14” piece. This will provide a slightly biased edge without wasting too much fabric.  


Take one bias cut 5 ½ ” x 12 ½ ” rectangle. Fold one 12 ½ ” edge back 1” and press.
Repeat on the other two bias cut rectangles. Leave the straight cut 5 ½ ” x 12 ½ ” rectangle flat; this will be the base fabric.


Lay one bias cut rectangle on top of the base fabric so they overlap by 1” on the long side. Align the raw edges of the two pieces with the fold of the bias rectangle on top. 
Repeat using a second bias rectangle on the opposite side of the base fabric.
Repeat again on the second side of one of the bias pieces.

All layers in order, marked, and stitched along the lines.
Pin all layers together, and use a disappearing fabric pen to mark the following horizontal lines across all the pieces:
·         ¼” from bottom
·         4 ¼” from bottom
·         8 ¼” from bottom
·         ¼” from top

Carefully sew along each of these marked lines.


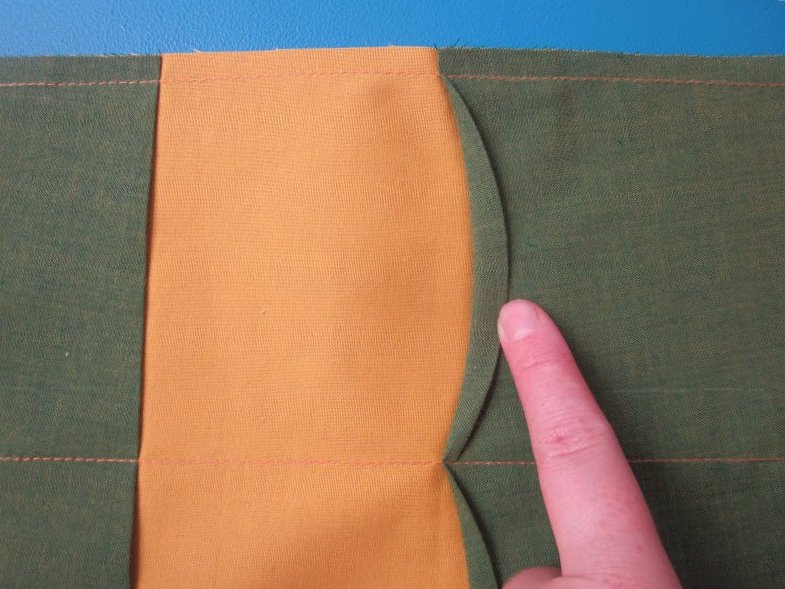
Press the vertical fold between each of the lines away from the base fabric. The bias edge will curve gently. Each curve should be approximately ½” at the widest part. Press the curve into place.


Press one vertical row then top-stitch the curve close to the folded edge. Repeat for all rows.


Trim block to 12 ½ “ x 12 ½ “


If you make one of these be sure to add it to the Cathedral Window QAL Flickr page and you may win one of the fabulous prizes! And as always, if you make a block using this tutorial I'd love to see it! Add it to my Flickr group too!

***

Tuesday, September 25, 2012

Whoa Whoa! My first Pellon Project!

Today my very first Pellon Project went up on their website! I'm so excited to share my Bubble Pillow with you!

Bubble Pillow
The prototype for this pillow was gifted to my cousin's baby Chloe (ok - Chloe is less baby, more toddler now). I love the finished product - so cozy! Make one for yourself, or for a friend! Go ahead and snag the free download here on Pellon's site!

I hope you're as excited about this as I am! If you make a Bubble Pillow I'd love to see it! Drop me a line here or add your pics to my flickr group! Happy Sewing!!