Showing posts with label free motion quilting. Show all posts

Thursday, April 17, 2014

Pillows and Fancy Free Motion Quilting


Recently I've been working on honing my skills at free motion quilting. I've been working mostly on smaller projects which lend themselves well to being densely / intricately quilted. I'm still not where I want to be with this, but I'm working on getting the movement and flow down so that it will translate easily into all my quilts.


On a whim this week I decided to make a pair of pillow covers for my cousin and his fiance. They are getting married this weekend, and as of last weekend I still hadn't decided on a gift - so handmade seemed to be the best option!


You might notice that these are made with the scraps from my "Modern in the City" challenge. The strips and strip sets were already partially pieced so why not? Jason and Andrea have not yet solidified their decor style - but both their living room and bedroom have grey and blue so these can go either place. I sure hope they love them as much as I do!

Friday, March 21, 2014

Chicago: A City Of Hope.

I can't believe it! I finished my challenge quilt on time!!


I finished on Wednesday, and it was so gloomy out that my pictures were not that great. This challenge was to be entered online, and the judges will only have our pictures and artist statement to go off of when deciding which quilts are used for the show... so I wanted my pictures to be great. I waited until Thursday (the last day for submission!), so I could get some better pictures.


I did indeed get better pics. I'm quite impressed. My friend Judy suggested taking my quilt to the public library to photograph - since the architecture at libraries typically allow for lots of natural light. She was right! My library has huge windows all along the sides, and they're the frosted glass kind, so it's not direct sunlight. Perfect! I walked back to the young adult stacks and laid my quilt on the floor (dark brown carpet - pretty neutral background!) - and I started snapping away. No one even noticed me, and if they would have I'm sure they wouldn't be bothered. 

So there you have it. Take your quilt pics at the library. Pick up a good book while you're at it!

My challenge quilt is titled "Chicago: A City of Hope." It's a really abstracted version of the Chicago map. The quilting is done in the layout of the Chicago El map, and it's bound in (pieced) Chicago flag stripes! 


I'm really happy with how it turned out. I don't specifically have a need for this quilt (other than to enter into the show), so I have listed it for sale (should it be accepted for the quilt show, it will be for sale there). That would be a nice addition to my Quiltcon fund. :) 

For now I'm just glad I got it done. Here's hoping it will hang with the rest of the "Modern in the City Challenge" quilts at the IQF in Chicago! 

Tuesday, September 10, 2013

Hello old friend...

Today I had a day off. 


(I've been so behind on blogging recently that you all don't even know that I'm working full time again now. No more 2.5 days a week. :( but on the plus side that means we have an easier time making our bills!) 

Part of my new sewing area! Bigger table, tiny stash shelf, drawers of notions. I also kept my old wardrobe for big storage.
I shouldn't blame the lack of sewing / blogging on the increase in work hours... but I guess that contributed. 

Sewing table! My new table is so much bigger -- that's an 18" x 26" mat. Whew!

Also - we moved! Whew - I'll be glad if I don't have to do that again anytime soon!


Today while Allie was at school (a new, fabulous, awesome school -- the major reason we moved)... I finally sorted out my sewing space. It's a shared space with our bedroom - which luckily is a nice big room with lots of sunlight!

Jelly Belly's help with FMQing!
So. I sewed today. 

I grabbed a "project bag" of scraps that I'd sorted by color palate way back before the move, and I set off to make a doll quilt. No sense in trying to tackle any huge project right off -- it had been more than two weeks since I'd sewn, and never before in this house -- so simple and non-thinking seemed about right.

I really wished I had had more of the Moda Bella Strawberry, but those little bits were literally the last bits I had on hand! Other than that I love how this turned out. I used only what was in the project bag, and those were tiny scraps! 


I managed to finish the quilt with enough time to take pictures before Allie got home from school! This little one finished at about 11" x 15" 


Hopefully this is the start back to quilting several times a week, and blogging just as often! :) Thanks for bearing with me while I got my stuff together!


Sunday, April 28, 2013

Mini Quilts: Mug Rugs


I've always been a huge fan of mug rugs. They're tiny, fast, and useful. It has only been recently that I've begun to really think of them as mini quilts though. I can put some intense piecing and quilting into a 5" x 8" mug rug - so why not recognize it as something more than a coaster?

I'm rambling.

What I'm trying to say here is that I made a mug rug recently. But I haven't been able to bring myself to use it yet. Actually I considered giving it away - I have the intention of making a mug rug soon for a friend - but this one isn't quite perfect enough. 


I love this little guy though. Scraps of some favorite fabrics, bound in the most perfect orange fabric (my last bit of it!)


Then there's the back. The back!! I wanted to test out my skills after long arm class, but the mug rug top didn't want fancy quilting... so I quilted the back separately. These are the best flowers I've ever made! Now I need to work on getting some consistent swirls! 

All this rambling, for a sweet little mug rug. I love it though, that's what matters. 

Monday, April 8, 2013

Oilcloth Pouches - and a new sewing student.

This weekend we had guests in town - it's not that uncommon for us to have houseguests. Living in a big fun city means that most of my friends and family back home have more reason to visit!

This time around it was my sister's friend Jenna and her two kids - as well as my neice Katee - a stowaway! :) We had a ton of fun, and Allie loved having the kids around (Jenna has a girl allie's age, and they LOOOOVE each other).

Jenna's pouches! She was on a roll!

In the evenings once the kids were worn out and in bed, Jenna and I sewed.

She had very little exprience sewing, but was a great student. Over the course of two evenings she made three pouches! Hers are made from laminated shopping bags - repurposed into zip pouches! It's much more economical than using real oilcloth.

Oilcloth pencil pouches!

While Jenna sewed I made a couple pencil pouches myself - two of them are made out of the Oilcloth samples I got in the QuiltCon goody bag. The oilcloth really is nicer. The third pouch I made used the laminated shopping bags (the blue pouch).

I think I'll put these pouches up on Etsy - that's my goal for the week.

If you're looking for oilcloth check here and here (laminated cotton). That shop is local to me, but they have a few decent choices. 

Detail of the front of the mug rug!

The second night of Jenna sewing I worked on a nice little mug rug. It's been a couple months since I made a mug rug - I do love them.

Some FMQ practice. This is the back side of the piece - which sows the quilting so well!

The real exciting part of this was playing around with the FMQ on the back piece (I quilted the front and back separately). 

Sunday, April 7, 2013

The Original Sewing & Quilt Expo - Shaumberg


Yesterday I was lucky enough to be able to go to the Sewing Expo. You might remember my post about it last fall. My guild's doll quilt challenge quilts are traveling with the Sewing Expo quilt show - so it's super exciting to be able to see them on display!

Pretty examples of quilting. By Lisa Sipes!
This time around I was really lucky to be able to take a longarm quilting class with Lisa Sipes (you might recognize Lisa's work - she quilted the best of show from QuiltCon, as well as many other awesome quilts at the QuiltCon show). I love Lisa's work and her crazy spirit - but I wasn't able to sign up for the class. Lucky for me though, my friend Sara had signed up for the Thursday class, but she had to be out of town that day -- and without being able to get a refund for the class she passed it on to me! Do you guys understand how sweet Sara is? Totally sweet! (Thanks Sara!!!)

My FMQ sample from Lisa's class - much less inspiring than her quilting... I have a way to go!

So I headed to class Thursday and it really was a blast! I had taken a longarm quilting class with Angela Walters at QuiltCon so I had a little experience with the machines beforehand. Lisa was great - crazy and fun. It was a lot of fun to play on the machines too. 

As far as class went I feel like I learned a bunch, built upon my previous knowledge, and I"m a little bit more comfortable on the longarm (remember my goal is to quilt this - renting time on a longam). In comparison to the class at QuiltCon I can say that I liked the HandiQuilter machines at QuiltCon better than the Gammil machines at the expo. We had some repeated thread breaking issues on our machine at the expo - eventually it was helped (but not solved) by having a new needle and a new bobbin... but that was class time wasted if you know what I mean. I can say too that at QuiltCon they were VERY generous with materials... we were pretty limited by materials on Thursday. -- micro quilting anyone? :) 

My FMQ samples from the QuiltCon Class - big!

Here's the thing though - the inspiration of meeting Lisa, and seeing her amazing quilts was enough to make me want to quilt something. It was a lot of fun. And... I shared a machine with a fellow Juki lover. 

So where does this leave me? I'm not yet ready to tackle that big quilt on a longarm... I'm still too nervous to do it. BUT - I'm pretty sure I'm ready to play around and try some things on a smaller / less precious quilt. I'm going to look into it and maybe this spring I'll rent some time to do a simple quilt on a longarm. It's a start. I certainly don't have the means (or space) to invest in one of these machines but I think they'd give me the ability to add a bit more personalization to my quilts. 

For those of you who longarm - any tips? 

Thursday, November 15, 2012

Playing with some new Pellon!

You might know that I really love adding words to my projects... (heck I have a whole pinterest board for it!) but I'm not very good at hand embroidering words. Much more is the fact that I don't enjoy it nearly as much as every other aspect of quilting. I've always been wanting a way to add these touches to my quilts without spending the time and annoyance to hand stitch them. 


Recently my way of doing this is to free motion quilt them into the finished quilt. I'll add a name here or a word or two there. It's a battle to get neat and precise words when you're FMQing a large quilt. I've been doing quilt labels like the one below - by making a whole quilt sandwich and then trimming it down and stitching it to the finished quilt. It's not as neat and tidy as I'd like. 


A few months ago Erin sent me some samples of this Fuse-N-Tear 371R. It worked exactly as I had hoped! 

Check out how fabulous my words are!!


Those pink lines are about 1/4" apart. Yes, I had to test it in tiny. This method works just perfectly with 1/4" cursive letters! 


So what should I make with these? I think the books one will probably become a journal cover (using those two awesome book fabrics from connecting threads. The pink one will definitely be a pouch. Help me plan my Happy Little Pouch Hop pouches! What shape? What fabrics? What kind of details?

(linked up to WIP Weds)

Tuesday, August 28, 2012

Bella Solids FMQ Sampler


The quilt that has been finished for weeks - but I couldn't get wally to hold up for me! :) This is the quilt made with the samples from each of my days of the Bella Solids Parade. I joined them together using a quilt as you go method. I'll probably break it down with pictures here. I did take pictures along the way - but they're a little dark. 

I used strips of all my Sketch fabrics for the binding between the panels (on the back). I also used Pellon Wonder Under tape. It made those strips more manageable! 

I have no idea how this will wash up/shrink up though since the density of the quilting is so different in each block! We'll see! 

Sunday, May 20, 2012

AAQI Sold!!!!


My Alzheimer's Art Quilt Initiative quilt has sold!! I don't know who purchased it (it wasn't my mom), but I sure hope they really love it! I'd love to hear from them too - if it was one of you! 

Feeling sad that you didn't swipe it up first? Go on over and check out the other quilts made by my guild. There are some fantastic quilts there! My favorite one has already sold --- to another guild member Sue! :) 

Please, if you have the money to spare, find it in your heart to purchase one of these sweet little minis! The money goes to fund Alzheimer's research - which is much needed! 

Thanks again to whoever bought my quilt!!

Friday, May 18, 2012

Blogger's Quilt Festival


It's been a while since I've participated in the Blogger's Quilt Fest. It's always so inspirational to look around and see what everyone else has made!

I've chosen to share my Doll Quilt Swap 12 quilt. I made this quilt for the fabulous Mona who was my secret partner for the swap. It measures about 23" in diameter and was mostly paper pieced. Yes, there is some tiny piecing going on there... it's just my favorite most "me" quilt I've ever made. This was my first try at  drafting paper piecing patterns by hand (those arcs of flying geese around the outside), and I happened to fall in love with hand drafting and paper piecing.


Another first on this quilt, was that I made use of very specific types of free motion quilting on different areas of the quilt. the movement between micro quilted pebbles to free motion zigzags, to radius' out to the points. It was a lot of fun and I'm really glad I gave it a try!

The final moment of excitement once I'd finished the quilt - was realizing that my detailed "hanging structure" using boning and plastic hoops tacked to the back actually supports the circular shape! I was so worried that it wouldn't be able to be hung! All the time I spent going over it in my head worked out well in the end!

You can really see all the quilting here!
As I said before, this is the most "me" quilt I've made to date. It was hard to give it up and send it to my partner, but it was such a joy to make this quilt. Sometimes it's best to just let all the crazy ideas in my head out - and put them into a fantastic quilt. There's a very special place in my heart for the Doll Quilt Swap, and even though I knew I'd likely never see this quilt again, It still made sense to me to make it and send it to my partner. There's so much growing that happens when you're inspired during a swap. It's really important to me to be ok with letting go of the actual quilt.

There you have it. My ramblings about my precious Doll Quilt 12 quilt! If you'd like to hear the whole story this link will take you to the rest of the story!

Now go enjoy all the other quilts linked up for the blogger's Quilt Festival!

Amy's Creative Side

Saturday, May 12, 2012

A Flight of Hope: Alzheimer's Art Quilt Initiative


I'm so happy to see it listed. I came to make this little quilt because our Chicago Modern Quilt Guild decided to  work on them at a meeting and send them all in as a group. Truthfully I had only heard of the organization in passing prior to that. I'm so glad that I know of them now! You see all around me there are people suffering from Alzheimer's or similar ailments (my Grandma for one, but also my MIL has spent years working with Alzheimer's and dementia patients). AAQI is raising money to fund research to find a cure. 


Go on over and have a browse at the little quilts they have up for sale and auction. You'll find the CMQG quilts listed here (ok they're not listed as a group yet - I'll update when they are). Mine is here. There are some really cute quilts to be had. Most of them have "fast finish triangles" which means they're easily hung with a small nail and a straw or chopstick. I'm sure you could even put them in a frame too. 


If anyone is interested in making a quilt to be sold or auctioned on AAQI check it out - it's really easy to submit a quilt! 


Here's a little bit about my quilt and my inspiration for making it: 
The title, "A Flight of Hope", describes not only the flying geese quilt block, but also the desire to fly away from the troubles caused by Alzheimer's. Around the center panel I quilted inspiring words, including the word "Hope." We have hope that one day we'll have a cure for Alzheimer's. 


Now go buy my quilt! :) 

Wednesday, April 25, 2012

Clover & Violet's Sophie Beach Tote!


Here's a big reveal! A couple weeks ago Jennie @ Clover & Violet asked if I'd like to sew up an example of one of their patterns (there shop is here). Of course I said yes - and here it is!! Now Clover & Violet has some awesome patterns, but this one spoke to my aesthetic a bit more than the others. It is so fabulous!!

Washi tape fabric!
First I started planning - I had to wait for these fabrics to be delivered - but they were well worth the wait! I had really wanted to use Heath in steel grey instead of the natural solid... but I just couldn't swing a trip downtown to the Needle Shop for some -- so natural it was!


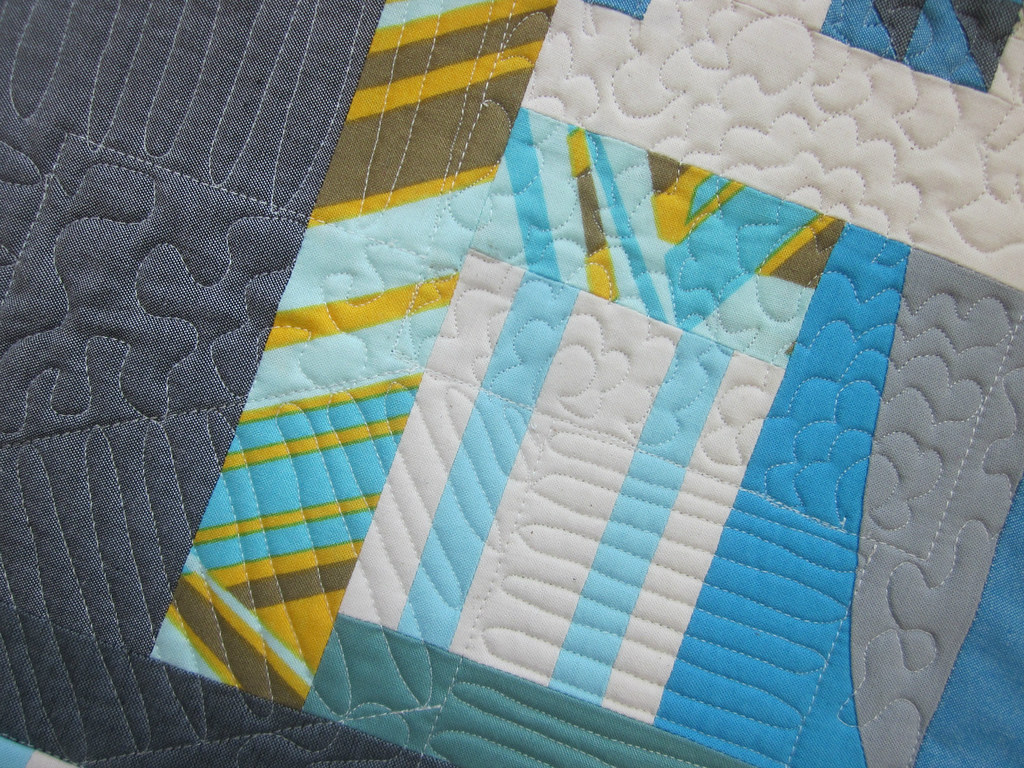
 Next pinwheels happened. 32 pinwheels to be exact. In retrospect I maybe should have used Thangles... since they ease the headache of drawing those lines down the middle for HST's. But all in all I'm really pleased with how perfect the points lined up! (I used some of the charm squares that I received from Marilyn in my DQS12 package for these pinwheels - perfection!).


 I stayed up rather late a couple nights in a row for this one. (pardon the night time pictures!). Once I got started I just didn't want to stop! This project really surprised me in that once I had the outer part of the bag layed out (picture below), I really wanted it to be a baby quilt... even though it's not really my normal style for a baby quilt - it's so cute!

Sorry for this terrible picture - but it was so precious hanging there!
I had to take a picture of it!
 I quilted mine using an organic crosshatch; then I added a sweet FMQ'd string of loopy hearts above the pinwheels. 
Yes, I had to use a screwdriver to pry off the not  right snaps.
Next I tackled the inside pouch. It was late at night and I had a lot of trouble trying to set those snaps. It was my first time trying snaps... it took going to bed and trying it in the morning for it to work right! 


Look how beautiful they are! So perfect!


 Here's a shot at the zippered pouch snapped on. Aren't those snap panels so clever? I would never have thought of doing that - but it'll sure be handy with the size of this bag. otherwise it would be impossible to keep track of it!


Now here we are with the bag all finished! I even made a fancy covered button - who knew they were so easy to make??!! Why hadn't I tried them before? 

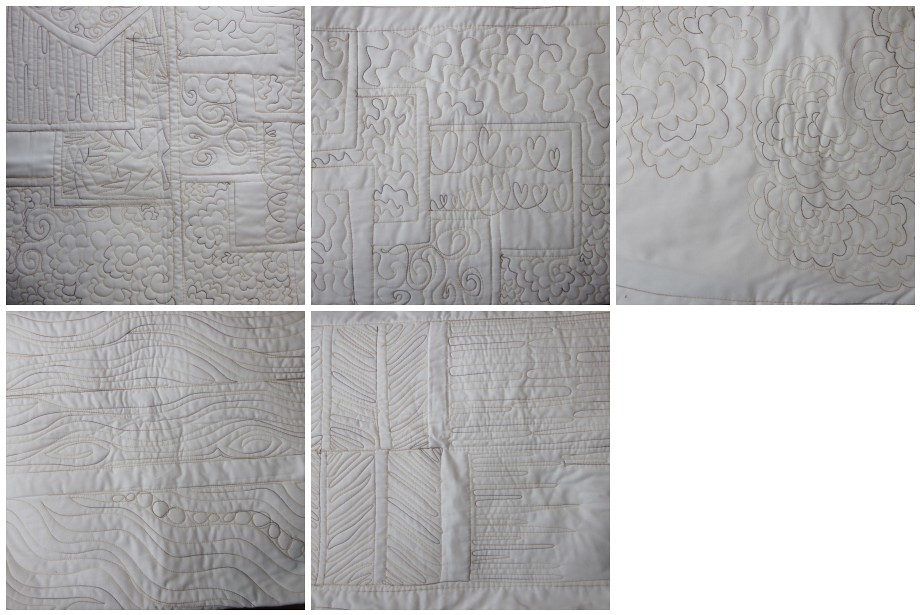
Click image to see the larger version -
check out those FMQ'd hearts! I'm in love!
If you're wondering the size of this bag? It's huge! the boxed side corners finish at about 7" wide... it would easily hold a couple towels and stuff for the beach, and for my pictures here I stuffed it with an 18" pillow! I've decided that this bag will be my official "bring show & tell quilts to the guild meetings bag." I'll also use it to pack things into for our numerous trips back home to visit the family! I can't stop oohing and ahhing over it!!

Friday, March 9, 2012

Quilting Quilting Quilting!!

Free motion quilting has been on my mind recently! And here is what I have to show for all that obsessing! 


Last night I took the time to back, baste, and begin quilting my Doll Quilt Swap quilt. I started with the idea of doing some micro-quilting, pebbles inside the center of the NY Beauty block, then to add the same tiny pebbles around the outer edges of it too. After that I added some free motion zig-zags and outlined the points (woot woot for actually having coordinating thread on hand!). 


I decided to loosen up the quilting as I got farther from the center, so the pink area was straight line quilted about an inch apart. I'm not entirely sure how I'm going to quilt the flying geese. I've thought maybe I'll outline them with a straight stitch (using white thread) just to pop them out a bit. 


I decided to leave the hexagons off for now... they may find themselves attached to a zip pouch or something as a little extra? No guarantees though. lol. I'm still really nervous about my partner really loving it.... but I'm really proud of how well it's turned out so far. 


Oh and that tiny star on the back? That's where my label will be -written in around it. It's my signature of sorts.... My favorite tiny wonky star. :)

I have grand plans of bias binding and a whole set-up that will allow it to actually hang flat on the wall... let's hope it works out! :) 

Oh yeah, and if you notice, there's not even a single bit of solid white fabric on this baby (one of our rules this round was to use a different colored solid as a dominant fabric, rather than white)... but much more, I only used a TINY bit of solid grey! That is much more of a challenge than not using white!