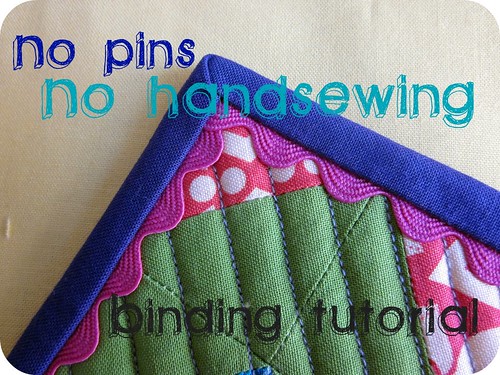
After a little encouragement from a friend, I've decided to write up a quick tutorial for the binding
I used here. No pins used (ever), and no hand sewing.
As background, I do follow
Amanda Jean's binding tutorial to prep my binding. I use 2.25" strips, although I think this may be easier with 2.5" strips (especially if your piece is as bulky as mine was).
Before starting be sure that your quilt sandwich is very neatly squared up. Those corners won't end up perfectly square if you don't. I've found that it also helps to keep things square if you've quilted the quilt a bit more densely (less for it to wiggle around).
1) Read Amanda Jean's tutorial. Cut strips (I use width of fabric, not bias) 2.25", join them as determined in the tutorial above.
2) Iron strip in half, using a spray bottle to steam for a very crisp edge. (I just use plain water, and use a spray bottle instead of the steam option since my iron tends to burn me with steam).
3) Starting an inch or two from a corner of your quilt, sew the raw edges of the binding to your quilt sandwich using a
1/4" seam allowance (binding layered on top of the
top of the quilt - not the back). Fold and turn corners as Amanda Jean shows.
 |
| Step 4 |
4) Use your iron tip to press the binding off and away from the quilt top. Don't worry about folding it around just yet. Be sure to put tension on that binding so that it's ironed neatly at the stitches. You can use the tip of the iron pushed into the corners too. If you've folded and sewn the binding properly in those corners they'll lay just right.
 |
| Step 5 |
5) Now hold the corner of your quilt between your pointer finger and thumb and flip the binding over to the other side.
 |
| Step 6 |
6) Starting in the middle of any side, iron from left to right, pulling the binding around as snugly as possible (without distorting the layers of your quilt sandwich). Iron straight to the corner, which will end in a little triangle. Use your spray bottle a lot, steam the heck out of every inch of the binding. This will make it easier to sew without it shifting.
 |
| Step 7 |
7) Carefully fold the next side on top - still working left to right. As long as you've got all the layers of your binding creased right where the edge of your quilt is the fold should be just in the right place. If not, fiddle with it a little... It helps to use a pointy tool (chopstick?) or your thumb nail to keep the folded part as it should be. Again, iron the heck out of it. Use lots of water. Make sure this is really crisp. Continue with the rest of the quilt.
 |
| Step 8 |
8) Notice that when you're all done those folds stay put without any help.
 |
| Step 9 stitch in the ditch. |
9) Now hold one of those perfect corners, and slide in your machine so that the
quilt top is on top. Starting at the very corner stitch in the ditch using your right hand several inches in front of the needle to monitor that fold as you sew. I don't find that this requires much monitoring. ****If you're having trouble stitching in the ditch, err on the side of your needle being farther from the binding - it'll look less messy than if you hit that binding.
 |
| Step 9/10 |
10) As you approach the corner (2-3" from it) use your right hand to hold the corner folds exactly in place. Hold the folds until you get within an inch or so to the needle. Slowly approach the corner and remember if you have any problems with the folded edge you can put the needle down, and lift up the presser foot to straighten it a bit (use chopstick - with foot off the pedal!). I find that it doesn't really require much fiddling. Use hand turn/wheel thingy to put the needle in the down position right at the corner, lift presser foot, and pivot the quilt.
11) Continue around the quilt. Trim your threads, and enjoy the perfection!
 |
| sewn binding, top view. |
 |
| sewn binding, bottom view. |
Enjoy!! I'd love to see your finished projects if you use this tutorial! Please don't hesitate to leave me a link or an email about it! :) Let me know if you've got any problems... I'm sure there are parts here that are worded funny.


This comment has been removed by a blog administrator.
ReplyDeleteVery nice! I've never tried machine binding, but I'd love to try your method. I've never thought of ironing the binding. I bet that would help with hand stitching the binding too.
ReplyDeleteThat's how I do my bindings (as long as the quilt isn't going in a quilt show). I also find that I don't worry about my kids being too rough and the hand stitching coming out. Great tut!
ReplyDeleteThat's exactly how I do it too :). I don't use any spray (did I understand right, you do?) but before the last stitch I hand sew the corners just to stay in place until I machine sew them. After this, I take out the thread.
ReplyDeleteIt's so easy! I love it that I'm not the only one doing this !
Wow, great tute. In the past I've had trouble getting machine-sewn binding to look neat, but armed with your tips I might just have to try it again! Thank you!
ReplyDeleteLove it. Haven't bound my mug rug, and I am 'sew' going to try this! Thanks for posting.
ReplyDelete~Kimberlee
www.TheSpunkyDiva.com
Hey Girlfriend! This is exactly what I was looking for around Christmas time when I was wanting to do this... I figured it out then, but am so glad you made this tutorial I am sure I will reference in the future, like the next mugrug I do.
ReplyDeleteLove ya, Anna
Yes great pictures make the explanation simple. Best seing machine this tuto.
DeleteI tried Machine Stitched binding once and it was disasterous! With this tutorial it might be worth trying again.
ReplyDeleteHa, I tied without handsewing the corners and it's perfect. Thabks for giving me the courage to try it
ReplyDeletethis is EXACTLY how i do my bindings! and i don't see myself going back to handsewing bindings anytime in the near future. makes life so much easier!
ReplyDeleteI can't wait to try this. Thanks so much for the idea!!!
ReplyDeleteI did this yesterday for the first time and it worked! I do not love the machine stitched binding as much as a hand stitched one but I'm not able to do hand work right now (due to an injury) and I had some baby gifts I needed to finish-- It worked perfectly! i will use this tutorial again~
ReplyDeletevery very nice thank you so much ^^
ReplyDeleteThis is a great tutorial! I have been doing something similar for a few years. I also use Mary Ellen's Perfect Press, this really helps to keep a crisp edge and doesn't have the residue of spray starch. Love your blog!
ReplyDeleteGreat tutorial! I use Mary Ellen's Perfect Press to get the best crisp edge that will hold the press. It doesn't leave a residue like regular spray starch. great site
ReplyDeleteI love this Tutorial... now I understand what I have been doing wrong!!
ReplyDeleteThanks so much!!
This is a great tutorial... it helps alot!
ReplyDeleteI've tried this but was not happy with the back result. Some sections were wider than others and it just looked messy. Maybe it was because I hadn't cleaned up the quilt edges enough and they were uneven. Will give it another go, yours looks beautiful.
ReplyDeleteHelp! I use fleece as a backing, and fold it over the top of embroirdered quilt top (with batting between the two layers). What is the best way to get a nice smooth mitered corner. I also hand stitch the pieces together and tie with yarn to keep the quilt together. Hope I have made myself clear on what I am trying to get help with. thanks for any help you can give me.
ReplyDeletePat
This is the same technique that I use! I sort of mashed together a few ideas that I've found online and through talking with friends...
ReplyDeleteAlthough, since I've splurged on those red clover clips, I do sometimes use those to help hold the binding in place as I do the last stitching. ;) (I'm often too lazy to get water for my iron - I should use a spray bottle!! - and without the steam, the binding doesn't stay folded very crisply for me.)
Hi Emily :) I did this for the first time today and loved it!! Thanks so much for the tutorial :)
ReplyDeleteHi, I'm relatively a beginner and still need a lot of help with technique. I found this tutorial and would love to try it with my next quilt. I am having trouble understanding, though... If you stitch in the ditch, how does the binding get attached to the top of the quilt? Won't it just fold back after you are done sewing it on? I'm sorry if this doesn't make sense.... just as I look at that part of the tutorial I am scratching my head. Thanks!
ReplyDeleteHi again! Thanks for your response, I really appreciate it, and I don't know why I'm a no-reply blogger, I'll try to fix that. :) This does make sense now, I guess I forgot that top was already taken care of... It was a silly question, now that I think about it. I just couldn't quite wrap my head around how it all worked but I've got it now. Thank you!
ReplyDeleteJust coming back (again) to say I tried it and I loved it! I may never hand-bind again! Thank you. :)
ReplyDeleteTo the people who worry about this binding technique on a quilt going into a show...don't. Judges have no problem with machine bindings (or any technique for that matter) as long as it is done well. If you take your time with this binding and make it look great, a judge should commend you, not persecute you.
ReplyDeleteFor the people who are worried about using this binding on a quilt going to a show...don't be. Judges do not have a problem with machine bindings (or any technique for that matter) as long as they are done well. Just take your time and a judge will commend you, not persecute you.
ReplyDeleteI just came across this on Pinterest. What a great idea! I was just thinking this morning that I was going to give up trying to machine stitch my bindings down because I just couldn't get it right. Plus, I really do not like getting stuck with pins constantly. I'm going to try this on my next quilt. Thanks!
ReplyDeleteGreat tutorial!
ReplyDeleteThank you from Italy, Emanuela
Great tutorial!
ReplyDeleteThank you from Italy, Emanuela
I used this tutorial to bind my first ever quilt, because I needed to finish it off quickly as a baby gift. I think it works really well, except my stitching is very messy. But I'd definitely use this technique again, but take my time stitching the ditch to get it neater. Thanks for sharing this awesome technique.
ReplyDeleteI use this binding on baby quilts, except instead of attaching binding on the front, I attach it from the back. Press out neatly and fold/press over and stitch it down on the front. Comes out very neat and with a baby quilt that will be washed, carried, stuffed everywhere (that's how I would like it to be used), it's a nice finish :D
ReplyDeleteGood job !
Great tutorial! I also use this method and have done for a while. It makes binding a joy, and I really look forward to finishing quilts these days. Handsewing has never been my forte.
ReplyDeletethank you! great tute ... it should help me get more projects finished!
ReplyDeleteI just found your tutorial on Pinterest and loveit! THANK YOU! I just blogged about it too!
ReplyDeleteI will try
ReplyDeleteI will try
ReplyDeleteCan nit wait to try this..it looks like I can do this ..I hope! Thanks!
ReplyDeleteHi: thanks for the tutorial and the links to other. A caveat, be sure to take a couple stitches in the miters as little fingers may get caught or tiny nails with small ones and pets. Turn the miters on each side of a single corner in opposite to avoid "snouts" in the corners. Again, many thanks
ReplyDeleteWhy is this called hand sewing? I thought hand sewing was all by hand with no machine? I am a novice - just wondering.
ReplyDeletethank you so much for this tutorial! the one step I DREAD (besides basting all those layers together by crawling around on the floor) is trying to get a neat edge on my bias binding! this sure makes it look easier than being stabbed by pins sticking out everywhere!
ReplyDeleteThis technique takes so much time out of finishing a quilt! Love it. One addition to the technique that I do is use a very thin stream of Elmer's School Glue as I am pressing the binding in place. The heat sets the glue, the glue acts like pins to hold everything in place, and it washes out.....gives me a little more confidence. Nice tutorial.
ReplyDeleteHow do you get the stitches to NOT show through on the back?
ReplyDeleteReally good job on the site, Thanks for guide!
ReplyDeleteJust tried this and it worked fantastic! The only difference is I didn't iron, and used binding clips to hold it in place.
ReplyDeleteWayne
Beautiful, cannot wait to try this. my page
ReplyDelete